Showing posts with label Cards. Show all posts

Wednesday, December 24, 2014

Tired Eyes and the Three Bears for Christmas

Oh my goodness my eyes are tired... I can't believe that I'm writing this at 3am... this seems to be a theme, and not one that I'm thrilled about but since I'm doing it to myself at least partially I can't complain too horribly. So, been up for about 18 hours maybe more(idk), but so far I've been to work, gone shopping for last minute Christmas gifts, Made a Birthday dinner for my father, Done the laundry and dishes, found time to make a blog post, finished a few last minute cards and once again I'm making a post. I have to be up in just a few hours to get the Turkey ready to go into the oven and then go back to work... :( Boo, I'm tired just thinking about it.

Any who I've been practicing with my copics and I stamped out some Lili of the Valley images that I bought last year.


I liked how the layout turned out, I think it's cute enough for a woman but also plain enough for a man. The Sentiment is part of the Grunge Sentiment set by Lili of the Valley, I was so happy to receive them for my birthday this year! The main image is James Bear - Christmas Tree.

This was the first image that I colored, it was my tester but I though that it was still nice enough for a card. I learned that it takes 4 reds in the copics to get this 'Christmas' color that I have on his hat. I'll have to double check but I think they were R69, R39, R36 and R26.

Second image, I liked this one a bit better, out of the three my mother liked this one the best.

Third image, I like this one the best (the tree at least) but it took a LOT of flicking!

Thats all for now, I'll add any relevant products later. for now I'm off to sleep! Products used for these cards: Glitter paper, Kraft paper, Doily, Lili of the Valley "James - Christmas Tree" and "Christmas Grungy Messages", Ranger Liquid pearls, Color Box 'white' ink, Copics and Art Institute Glitter 'Gold'.

Challenges entered:
Lolli Lulu Crafts - Christmas Challenge Launch (naughty or nice)
Deep Ocean Challenge Blog - Challenge #93 "Christmas is all around"
Kraftin' Kimmie Stamps - A Christmas-Eve Wonderful Wednesday! - Alexis
Kit and Clowder - December Challenge :: Animals


Friday, December 12, 2014

... So... it's been a while

     Umm... yeah. Title kinda says it all, it's been a while. < a hugely under exaggerated statement! So yeah, life kinda happened (or maybe it's that it didn't happen?). I wont drag on making tons of excuses but the highlights are that my craft area was over run, I kinda lost my mojo for a while and then last year literally on the day that I was planning on starting up and making Christmas cards I fell and sprained my wrist! My doctor was said that it was the worst sprained that he had ever seen with out someone breaking their wrist. So about 7 months latter my wrist finally healed up and I started to retake my crafting area!

So I'm getting back into the swing of things and recently discovered Kit and Clowder! I bought up the Skin and Hair class and I'm slowly making my way though it! I'm looking forward to the before and after pictures.

Today I'm sharing 2 cards. The first is a card for my friends birthday.


The image in the card is 'Take Me Away' by Tiddly Inks!

 
So you can see that I kinda fudged up on the legs of the tub. Next time I want to use gold I know not to use the pen's and instead just get out my paint and brush!

Next card is a Christmas card for the woman that sell me my MK moisturizer. No kidding that stuff really works, I was at the theater the other day and they gave me the student price! (ok maybe that was because I didn't have any make up on... I'm going with the moisturizer theory though!)


This stamp is 'Season's Greetings', one of my favorite's from Krista Smiths 'Simply Sassy' line. Also used on this card is Memory Box die - Snowflake Corner and a sentiment stamp by Dear Lizzy.


I made a little mistake on her eye that was covered up by some Shabby embossing powder. I also used a white gel pen, Ranger Liquid pearls and a clear Zig Wink glitter pen on her eye's and the holly.


Over all I'm pretty darn happy with how this card came together. I also used this image in a card exchange for Kit and Clowder, I'll post images of that card when the lady that I was partnered with receives it!

So that's all for today, I'm off to make more card's for Christmas!

~Sarah L

Challenges Entered:
Aurora Wings Challenge Blog - Challenge #9 Anything Goes
The Sugar Bowl - Challenge #119 Anything Goes

Saturday, August 25, 2012

Thank You With A Cherry Chibi

Bonjour!

Well I'll just get right into it, the card I have to share with you today has been a bit of a pain to make. I started trying to make it on the 16th I think... and It just was not coming together. I kind of had this plan in my head before I started and It was just not coming together like I had hoped. I could have gone out and spent $20 or so and I'm sure that It would have worked, but lets get real that is not something that anyone wants to do for just one card. So instead I finally threw out my original Idea and pulled it all together in about an hour last night. I'm happy with the way that it turned out, I made this card for a challenge DT call and so I could have something to send my grandmother. So here it is, let me know what you think!


Close up!


Inside view!
So that's, that. I really like the simple, clean layout that I ended up with. There might be one or two thing that I would change If I did this card again, like just using a black card base instead of white! Including the card I ended up with 5 layers of paper on the front!
So the Image used is another Manga Chibi by Sureya, Her name is Velvet and she is based off of another image titled 'The SOLDIER or The Cook?' by Kokoroyomi. Also note that while Sureya has free images that you can use for cards or coloring projects, these images can not be used on something that you sell. However if you like her style you can head on over to Make it Crafty's store and buy some of her stamps that she has for sale!
The embossing pattern is a folder from Cuttle Bug, the ribbon is just something that I have had in my stash for a while, the cherries are a die cut from Hero Arts, and the punch with red and white is from Martha Stewart. The image and cherries were colored with Copic and a white gel pen. And finally the sentiment was made by me! And let me tell you that was not easy to do, I'll post it below for you to use if you like.
I hope that everyone is having a good weekend so far, and if you have time Sassy Studio Designs is having a blog hop today with a new release of Disney Villains! Also Whimsy Stamps is on day 4 of there August release blog hop, and they have some really cute stamps and dies for you to see!


You will have to let me know if there is trouble with downloading this. I haven't done a downloadable image before so I'm in the dark.

XoX ~Sarah
 
Challenges entered:
 

Tuesday, August 14, 2012

Retro Jules

Good afternoon everyone! Well it's still morning for me, but I just know that I will get interrupted and it will be well after 12 when this gets posted! Today I have a cute retro-ish, very red card to share with you. I'm actually not sure if I can call this retro but the paper was EP - Happy Days I just love the rose print and those poke-a-dots.


The card layout is based off of the current 'A Die for a Sketch' Challenge (#3). This is only the third sketch challenge that they have posted but I like how they keep it simple. The sketch that you get just shows the paper layout and you are free to use and place embellishment's as you like.


Close up on the image that I used. There are a lot of challenges right now that want you to make your own background. I used distressed ink for a sunset cloud background and then for a field of flowers. I'm not so sure if I love it but it's kinda cute. I really like how I colored her dress but I'm thinking that I should have colored the poke-a-dot part on her dress blue instead of red.


I tried to follow the sketch through on the inside with a few small changes and a little less embellishment. When I went to cut out the red circle I couldn't find my extra red paper, so I ended up cutting it out of the middle of the background red. Once I had everything together and started to put stuff away I then ended up finding the extra red paper that I had had out. Isn't that just how it works?


Final picture and big question. How do you attach your flowers to your cards? I had asked one person and she said that she just used glue dots. When I started using flowers on cards I would cut off the stems and then place them using glue dots, though I did try to use glue a few times and figured out fast that it wasn't going to work. Now I tend to twist the stems of my flowers together before using glue dots to place them on my cards. So my question is, short of stapling, is there any other way besides glue dots to adhere the flowers to a card?

~ A small tip from this card, when using ribbons that have a loose weave they tend to fray very quickly. There is a product called Fray Check that you can use on the ends of the ribbon, you only need to use a small amount and it drys fairly fast and clear. I really like it because I don't have to worry about my bows falling apart thread by thread.

So the Image was colored with Copic's and distressed inks, the roses are from wild orchid crafts, Spellbinders Tear Drop Circles and the Standard Circles were used as for my die cuts, the butterfly is from a Close to my Heart package from about a year ago, the bow is just a piece of scrap ribbon that I had and a corsage pin is stuck through the middle, and the image is Saturated Canary - Jules.

Thank you for stopping by!
XoX ~Sarah

Challenges entered:
A Die for a Sketch - Challenge #3
Saturated Canary - Challenge #23 The Great Outdoors
StampARTic - Dies
Allsorts Challenge Blog - Week 167 Going Around in Circles
Just Some Lines - Layer it Up Challenge
Totally Papercrafts - Challenge #120 Frame It
Crafty Ribbons Challenge - Challenge #25 Seeing Spots and Dots
Simon Says Stamp - Lets Play BINGO  (Ribbon-Free-Blooms and/or Die cut-Free-Glitter)

Thursday, August 2, 2012

Manga Chibi

Hello everyone, have we enjoyed our week so far? Any big plans for the weekend? I myself don't have any big plans, though after today I have the rest of the weekend off. We have been having some nice weather lately so I'm hoping that it will hold out and I can catch some rays! Well enough about that, today I'm sharing a card that I made up last night. I was really hoping that the Gorjuss Girl stamps I had ordered would have shown up in the mail yesterday, but sadly they didn't. So Instead I went ahead and made a card with a cute Chibi image by *Sureya.


Cute right? I like to think that I'm getting better at this shading and coloring with Copic thing. I had seen a tutorial where it was mentioned that a BV color would help you image look more realistic. I went ahead and tried it for this image but I thing that I used a little to much on her forehead, though I think that I did pretty well for her arms and neck area. The legs again maybe a little too much, but hey I'm still learning. My biggest problem doesn't come from using the Copic's them selves but rather waiting long enough for the ink to dry. Sadly I don't get the opportunity to wake up in the morning and know that I will have the time to make a card that uses 'X' paper and 'X' image. I usually get home and find that I have the time and inclination so I find a sketch or Idea for what to do and find an image, then I just want to go straight into coloring...


So angled view and a view of the inside, I tried to keep with the sketch and follow it through to the inside. The paper that I used is 'Hello Summer' by Echo Park. The 3 heart buttons in the upper right corner are Button Farm (make your own) Buttons also using the 'Hello Summer' paper. The white flourish on the corners of the image are a Memory Box Die, Quinn Flourish, cut in half. and the Motif with 'Faith, Hope, Love' stamped on it is from Spellbinders 'Persian Motifs'.

*I'm not sure if they still make the Button farm thing. I bought it 2 years ago at a CKC show but I didn't see it this last year and I can't seem to find it on the web. If any one knows if and or where you can get these though I would love to know where to get more.*

Be sure to check out *Sureya 's open coloring book if you like this image, while I can't find this exact one in her coloring book at the moment. She has a bunch of other really neat manga type images!

I hope everyone has a wonderful weekend!
XoX ~Sarah

Challenges Entered:
CMC Copic Challenge Group - Anything goes w/ a Girly Twist
Card Crafters Circle - Challenge #33 CAS Clean and Simple!
Pile It On - #31 Cute as Can Be
Graphicat Sketches - Challenge #13
Stamp N Doodle - Use Your Favorite Color (pink and blue)
DYSU Challenge Blog - #83 Polka Dots
Cute Card Thursday - Challenge #228 Clean & Simple
My Heart Pieces Digital Stamp Challenges - Use Designer Paper

Sunday, July 29, 2012

A Fairy Bee Card

Hey everyone!

So how was that post last Sunday? Everyone enjoy it? Ok, yes... that's a joke. I'm really sorry about that, I woke up sick again on Sunday and couldn't breath much less think, turns out that I developed a sinus inffection. Got some med's on Monday and spent the next few day just feeling bleh. But, were over that now... kinda. This card that I'm sharing is one that I made up last night for a friends sister. For some reason I just always see black and yellow as her colors, so we have a black, white and yellow card today.


So I used a white on white resistance circle pattern paper for the background circle and distressed it with black ink. Two doily's were used too make a nice ruffle frame that was glued it behind a Lacey Circle Spellbinders. Spellbinders in the corners are from the 'Fleur De Lis Accents', and in the top left is a Memory Box die cut 'Elegant Scrollwork'. Pearls are used in the background as well as pearl head pins sticking out of the flowers. The flowers are from wild orchid crafts and were all yellow to start with but I used my yellow copic's to add some extra color to the tips of the petals. Also used a cute black and white check ribbon to make a bow for the corner.


Close up! I just love all of these yellows, they make the whole card look so happy. Some glitter was used in her hair as well as on her wings and shirt, she is a fairy after all. As for the 'Bliss', I thought that it fit with the card but it also happens to be the name of the girl I made this card for.


A little play on words, more die cuts as well as some washii tape for the inside of the card.

Well thats all for now, I will be making another post today with all that i promised last week with the art walk and all. Cant wait to show the painting that I bought, so pretty! I hope that all of you had a great week and awesome weekend!

XoX ~Sarah

Challenges Entered:


Saturday, July 21, 2012

A Birthday Card For My Brother

Hello everyone,

How was your Saturday? Being on the west coast its only just getting to 6PM here, but for many of you it's already come and gone. I'll share all about my Saturday tomorrow, but for today I have a Birthday card that I made up for my brother. And this time not only is it done early, but he will be getting it early as well- *gasp*!


So nothing to fancy, he's a guy who just doesn't see the need for that stuff. Though he does love his cats. Cats and Trains are what hes into ever since he was young. And while I would get a whole big lecture about why the train that I choose was wrong or how I should have colored it, I figured that a cat image was a safe bet!


A close up on the cat. I was coloring late at night so I ended up trying to add a weird elementary school sun. I kinda tried to fix it, I'm sure that he wont even notice. I was also using water color pencils and trying to get some shading in on the cat, I think I kinda succeeded but that can be a bit hard to do as well, you almost have to work in layers.


Last picture of it standing up. You can see that I put in a pocket for a gift card back there. I used a glassine envelop and then put paper over it to write a message on. Over all I think it worked out, though I kept wanting to add flowers or bling to it! All of the things that I used on this card were just kind of leftovers that came together from my stash, though the stamp is 'La Blanche'(? those were the only words that I could find on the stamp).
Another post tomorrow about the Art walk that was here in Gresham today, and maybe another card!

XoX ~Sarah

Challenges Entered:

Pals Paper Arts 139 - A Sketch Challenge
Dude Time Doodles Challenge - Anything Goes (For a Dude)
The Sisterhood of Crafters - Lets Hear it for the Boys
Wishcraft - Waste Not Wednesdays wk27

Friday, July 20, 2012

Tropical Snowman...

'Ello my freaky darlings!,

Lol, I couldn't resist. I only watched 'The League of Extraordinary Gentalmen' once, but that line has stayed with me and popped up at the most random times. How is everyone on this Friday evening? Big plans for the weekend? Me, I'm going to do my best to crank out some more cards and try and sew my quilt together. And somewhere in there I suppose that I'll have to go get my brother a birthday present.

Nothing too special to share today, I've been trying to make cards all week but people keep getting in the way. So today everyone was gone when I came home from work, I sat down and made a Christmas card based off of a sketch challenge. I'm all done making my card and taking a picture, then I'm looking for this challenge so I can link it up and... turns out the sketch I had was 2 weeks old! I just had to laugh! But any-who here it is...


So the paper is My Mind's Eye - Colorful Christmas, I used watercolor pencils, the Sakura 'Starbutst' (name?) pen, and some glossy accents on the image. The stamp is by Great Impressions, the snowflake border punch is Martha Stewart. I used the Elegant Scrollwork by Memory Box, and the 'Merry Christmas' (which I just thought was too cute) is by Impression Obsession.

Tip: I know that I've said it before but, all those snowflakes from the punch... SAVE THEM! I have no idea what I'll use them for but there so pretty. I'm going to make them into stickers and save them for another Christmas card or project. This is a great way to add to your backgrounds or even give them to the kids for there art projects! (and yes I love using '!' mark!)


So something new for me was using the layers upon layers of paper. I do love the effect when others do it, but for me I'm almost afraid to do that. This was one of the reason why I forced myself to do this sketch, trying to get past that fear and just create. My card was so 'top heavy' that even if I hadn't already planed on it, I just had to put paper on the inside so it wouldn't tip over.

Hope everyone has a great weekend and I'll try to post again by Sunday at the latest!

XoX ~Sarah

Challenges entered:

ATC & Cards With Attitude - Challenge 18 Anything Goes
Annabelle Stamps Blog - Say it with... Christmas
Stamping with the Dragon - Christmas in July

Monday, July 16, 2012

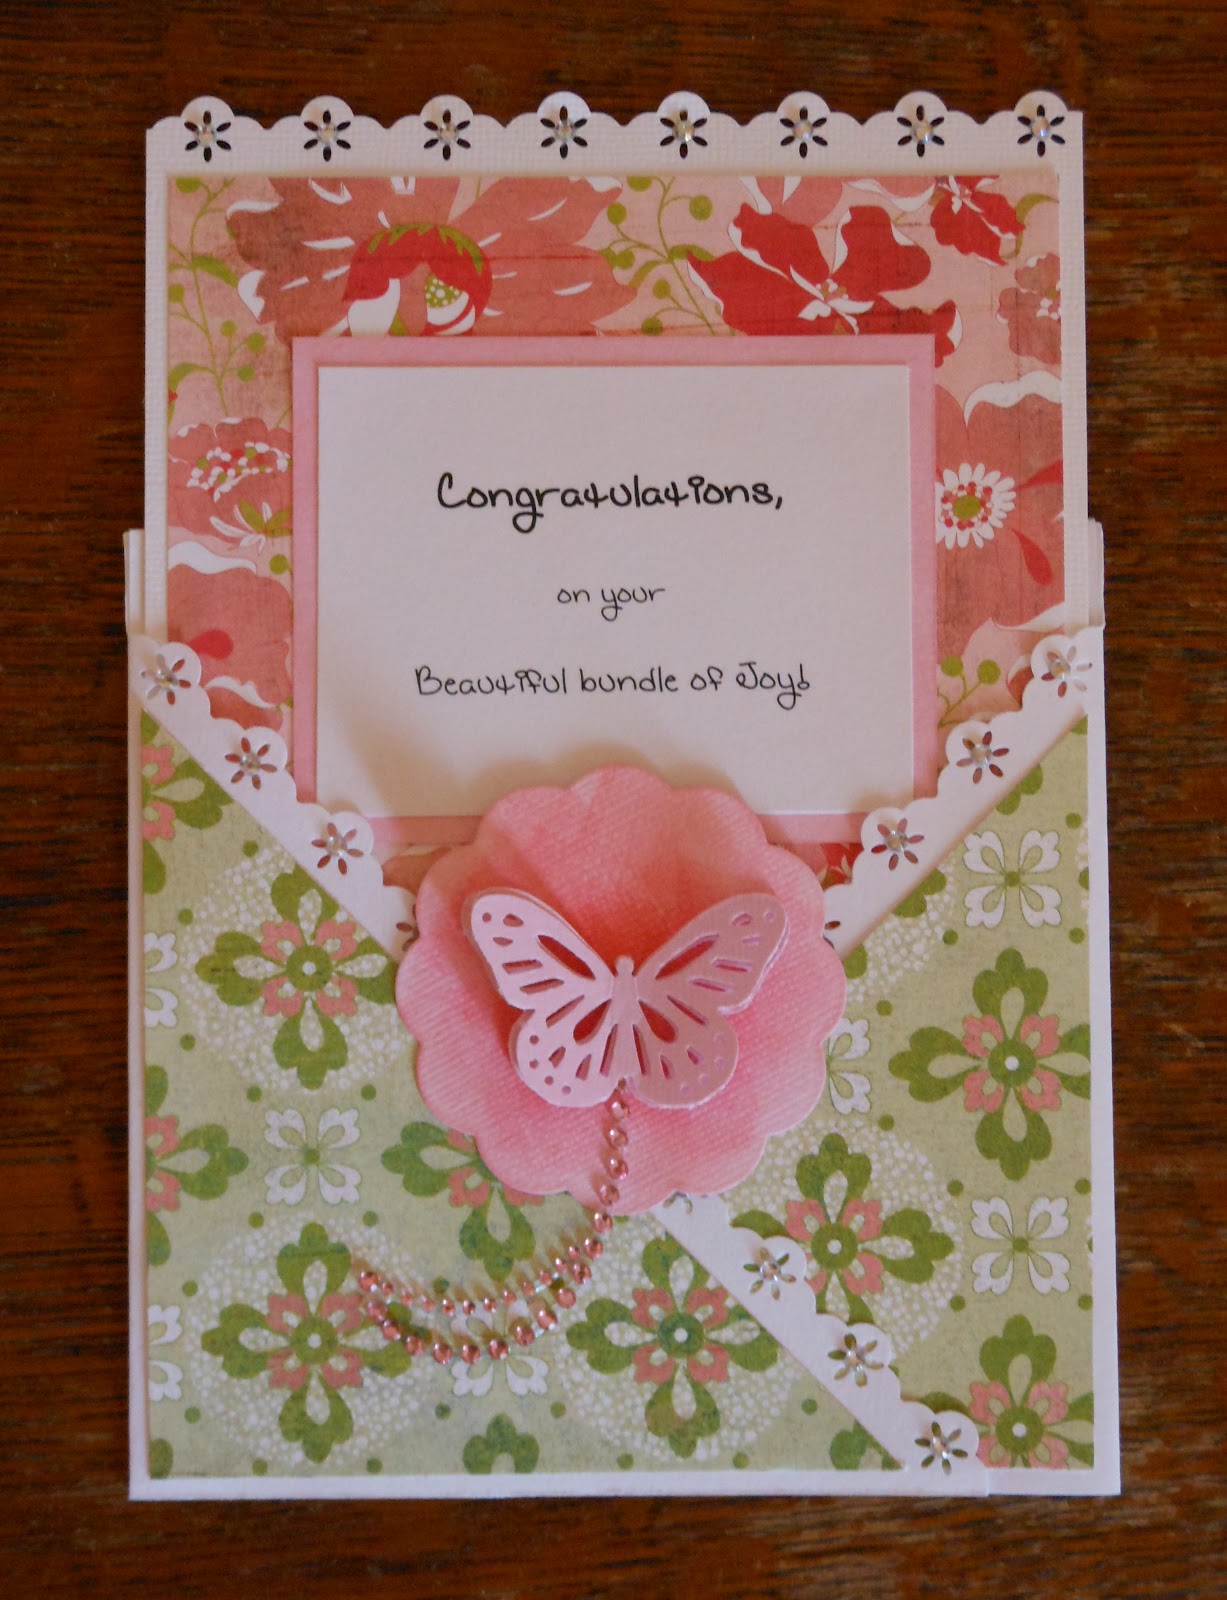
Baby Girl Pocket Card

Hello Everyone!

Not a whole lot to say today just sharing a card. I made this on the request of a friend, who's nephew's girlfriend just had a baby. It's kinda different for me because I didn't use a digi, or a stamp, though not for lack of trying. I have to admit that I was defeated by the image of a baby elephant! The image kept smearing, if it had worked then this would have been done on Friday. But as I was gone for the weekend, I finally admitted defeat this morning and used a butterfly punch from Martha Stewart.


Though I did not use a digi, I did print this out since I dint have a stamp.


So not much going on here. I used a flower border punch and put little gems in the middle of each flower. A scalloped circle by Spellbinders. A little rhinestone flourish. And the butterfly like I said above is Martha Stewart, I punched out 3 and layered them to give the wings some dimension. The paper is Olivia by Basic Grey. I was so happy to use this, I had bought a bunch of this a while back not knowing what I would use it for and now I finally have a card to use it on. I might end up making more of these just to have on hand or sell.

I hope everyone has a fantastic week, I'll try to get two more cards done and posted so check back if your following!

XoX ~Sarah

Challenges entered:

Stamping Scrapping Challenge Central - Bling
Make it Monday - Anything Goes

PS- it was ridiculously hard to find challenges to enter, everyone is doing Christmas in July and what not, lol!

PPS- insperation for this card came from Angie's post Sassy Wedding Garter on Yuki's Girls. Thank you so much for the insperation Angie, I was a bit lost on what to do and then I saw your card and knew that it was just what I needed!

Monday, July 9, 2012

Monochromatic - GDT Card

Morning everyone!

So this morning I'm sharing a card that I made for Paper Makeup Stamps challenge #44 "monochromatic".


 Don't be afraid to Google it! I know I did.

I was really excited to have a chance to make this card, and just look at this cute Moody image! The Image in my card is Moody for Snow, She can be found HERE in the PMS store.


To color this Image I used my copics. For her Skin: E000, E00, E01. For her Hair: W4, W7, W10. and for her clothes B60, B63, B66, B69. The snow both in the digi and on the card were colored with B60, then in the image covered with glossy accents, and on the card colored with a Sakura Star Burst pen to give some extra glimmer! Oh- and the doily was given a once over with the B60 as well.


Here I also wanted to give you a close up of my Flowers. I ran in to a problem of only having blue rose buds. No other blue flowers, I was kicking my self for not buying them when I had seen them. I just didn't know what I would use them for, now I know. Solution: take your white Flowers (roses in this case) and apply Copis! I'm sure that other markers or sprays would work as well. Don't be afraid to get down in there and if the front of the petal isn't taking the color or you cant reach it, then work on the back and it will bleed through. I also took a marker to the leafs and stems to make them a dark blue or maybe more like black. If you want to add glitter then simply use a glue that has a fine tip, apply to the edges of your petals and then dip in glitter and tap off the excess! You can even make your flowers two-tone, just apply the light color first then add the darker on the edges!

I hope you enjoyed, I'll try and post another card later this week. Something with a lot of Glitz!

XoX, ~Sarah

SpelbindersFloral Ovals
Flowers - wild orchid crafts

Click to head over to Paper Makeup Stamps challenge blog and join the fun!

Challenges entered:
The Crafty Blogger Network: Challenge Blog - Monday Challenge #1 Anything Goes
The Cutie Pie Challenge Blog - Challenge #22 Glitter and Bling

Sunday, July 8, 2012

On cards, Mosqueto's and Cup Cakes!

what a week, I hope that everyone had a happy fourth of July! Mine was pretty good, went and saw Spiderman in theaters. Great Movie! And then we set off our fireworks around 11:30, kinda late but my brother was working and we wanted to wait for him. We had some great fountains this year, and some other fire works that went BOOM! and I think that that is all I'll say on that.

So I've been busy working on card's and a quilt all week! I finally got some simple cards made up to sell at a friends booth in this consignment shop. I'm really hoping that they sell, I spent a lot of time putting them together. One would have only taken 5 min if that but when your making 64, that takes up a bit of time.


I really like these, there simple but still pretty. I stamped them with a Unity stamp and close to my heart sentiment. Then added some color to the petals and wings along with some glitter! Sent a set to my best friend as well, she loves faeries! Though I should mention that I still have not sent off that Birthday card from 2 posts ago. Yikes, I made it early but, life, what can you do?

On to other subjects I am really, Really, REALLY ALLERGIC to mosquito's. I was bit no less then 4 time's last Sunday night and developed the worst rash from them. My wrist was all swollen and I found myself driving with my knees because it hurt so much. I thought that I had a golf ball in my thigh! And still a week latter I find that they haven't gone away completely. Grrs, but at least my wrist isn't swollen up any more!

Now on to CUPCAKES!!!! YEA!!!
so sadly I do not have a recent picture to share with you but I'll post one from when I made them last year.


Yep if you didn't guess I'm sharing a recipe for Root Beer Float cupcake!

I found this recipe in a Better Home's and Gardens Special Edition.

Root Beer Float Cupcakes

Prep: 45 minutes  Stand: 30 minutes  Bake: 15 minutes
Cool: 45 minutes  Oven: 350F  Makes: 24


3/4 - Cup Butter (unsalted, room temp)
3 - Eggs (room temp)
2 1/2 - Cups All-purpose flour
2 1/2 - tsp Baking powder
1/2 - tsp Salt
1 1/2 - Cup Sugar
1 - T Root beer extract
1/2 tsp vanilla
1 1/4 Cups Root beer (I use A&W)
1 - Recipe Float Frosting (see below)
24 - Root beer candies (optional, I found mine at WinCo)
12 - Colorful straws cut in half (optional, you can see that I didn't use them but you would use the specialty paper straws with the red swirl and stick it in the cupcake at an angle to give the image of a drink, or in this case a root beer float)

1) Beat Butter on high speed for 30 sec. then begin adding sugar 1/4 Cup at a time. Scrape down bowl and beat till fully combined.  Add egg's one at a time scraping bowl after each addition.
2) Beat in Root beer and Vanilla extract, continue to mix until combined.
3) Add Flour Mixture (flour, baking powder, salt) and Root beer alternately until just combined (*note: when adding rootbeer the batter will look broken, DONT panic, just make sure that your last addition is flour and you'll see how it comes back together.)
4) Spoon into lined cupcake pans and bake (together if you like) for 15-17 min. once done then let cool.

Float Frosting:

1/4 - Cup Butter (room temp)
3/4 - Cup Vanilla Ice cream (let stand for 10 min)
1/2 - tsp Vanilla extract
4 - Cups Powdered Sugar

1) Beat butter in large bowl until light and fluffy, then beat in 1/2 Cup of Vanilla Ice Cream and the Vanilla extract. Scrape down the bowl and mix until fully Incorporated.
2) Beat in 4 Cups Powdered Sugar (a little at a time if you don't want to make a mess) scrape down the bowl and add more Vanilla Ice Cream if needed.

IMPORTANT: if you look at the picture above you can see that the icing gets a little melty, And YES you MUST refrigerate these cupcakes because of the Ice Cream in the Frosting until you are ready to serve. ** if you add a little bit of milk or half and half then the icing will hold up better and you wont have to worry about it melting, though you will still need to refrigerate it** Also both times I have done this the Frosting has been just a little short so you might need to adjust the proportions.

These Cupcakes are delicious and taste just like a Root Beer Float, perfect for the summertime or a special occasion!

Well that's all for today, I'll be posting another card tomorrow so look forward to that. I hope that y'all enjoy the rest of your Sunday!

XoX ~Sarah